Is your NVMe SSD getting cramped for space, or do you just want a faster, larger drive? Whether you’re upgrading your storage or simply replacing an old drive, cloning your NVMe SSD to a new one can save you time and effort—no need to reinstall everything! But here’s the catch: cloning NVMe SSD to NVMe SSD isn’t always as simple as it sounds.
Problem: You’re unsure how to properly transfer everything from your current NVMe drive to the new one without data loss or headaches.
Agitation: With countless guides out there, it’s easy to get overwhelmed by the details. Plus, not all cloning software is up to the task of handling high-speed NVMe drives efficiently.
Solution: In this guide, we’ll walk you through the process of cloning your NVMe SSD to a new NVMe SSD. With clear, easy-to-follow steps, you’ll have your new drive up and running in no time—no expert skills needed! Let’s dive in.
What Do You Need in NVMe to NVMe Cloning?
Before you jump into the cloning process, it’s essential to have the right tools and equipment at your disposal. While cloning an NVMe drive might sound complicated, the process becomes straightforward once you have everything you need.
First off, you’ll want to know how to transfer files from NVMe to NVMe without losing any data. Fortunately, with the right software and hardware, the process is quick and seamless. But choosing the right cloning software is only part of the equation. You’ll also need some basic accessories to ensure everything works smoothly.
Cloning an NVMe drive requires a few critical components. Here’s a list of what you’ll need to successfully clone your NVMe SSD:
- Cloning Software: You’ll need reliable cloning software to transfer your data from one SSD to another. Popular options include Wittytool DiskClone and Acronis True Image. These programs can handle the complexity of cloning your data while keeping your partitions intact.
- A Compatible New NVMe SSD: Make sure the new NVMe drive is compatible with your system and has enough storage capacity for all your data. Check whether your motherboard supports the new SSD’s interface (e.g., PCIe 3.0 or PCIe 4.0).
- SSD M.2 HDD Docking Station with Cloner: This handy tool allows you to connect both your current and new NVMe drives simultaneously. It ensures data is cloned over efficiently and securely, without the need for additional cables or tricky setups. A docking station that includes a cloning function makes this process much easier and faster.
- A Backup Plan: Before you start cloning, ensure you have a backup of important data. Cloning is generally safe, but accidents can happen, so it’s best to be prepared.
- A Stable Power Source: Make sure your computer and cloning device are connected to a stable power supply. Power interruptions during the cloning process can corrupt your files.
With the right equipment in hand, you’re ready to move to the next step: getting everything cloned! Let’s explore the step-by-step process of how to clone NVMe SSD to NVMe SSD in the next section.
How to Clone from NVMe to NVMe SSD with Wittytool DiskClone
Cloning your NVMe drive doesn’t have to be a daunting task, especially when you have the right software to guide you through it. Wittytool DiskClone is one of the best tools for the job, offering a user-friendly interface that simplifies even the most complex cloning tasks. Whether you’re upgrading from a smaller SSD MVMe to a normal NVMe or transferring data between two high-performance drives, this tool makes the process seamless.
To successfully clone NVMe to NVMe, it’s important to follow the proper steps and use a reliable solution like Wittytool DiskClone. This software ensures that all your data—whether it’s your operating system, applications, or personal files—migrates safely to the new drive. With a smooth cloning process, you can avoid reinstalling your OS or losing critical files.
But why Wittytool DiskClone? Unlike other software, it’s specifically optimized for NVMe drives, ensuring faster speeds and compatibility with modern hardware. Whether you’re moving data from an older SSD MVMe to a newer NVMe or simply upgrading for better performance, this tool has you covered.
Before we dive into the steps, here’s a quick overview of what makes Wittytool DiskClone the ideal choice:
- Speed: Optimized for high-speed NVMe transfers.
- Ease of Use: Intuitive interface with guided prompts.
- Comprehensive Cloning: From boot partitions to hidden files, it handles everything effortlessly. For exemple, clone ssd won’t boot can easily performed.
Now that you know why Wittytool DiskClone is perfect for the task, let’s go through the step-by-step guide on how to clone NVMe drives. Whether you’re a tech novice or a seasoned pro, these clear and concise instructions will help you get the job done without a hitch.
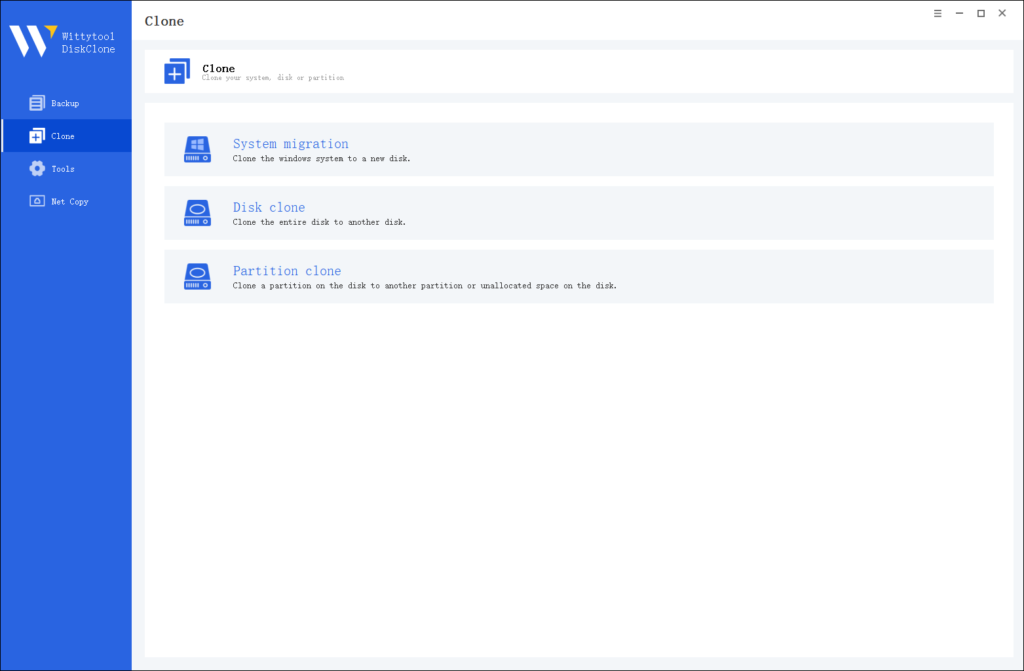
Step 1: Choose Disk Clone Mode
Click on the left panel to access the clone page, then select the disk clone mode.

Note:
During usage, choose the corresponding mode according to your needs. You can read this article about system clone vs system migration to understand the differences in different usage scenarios.
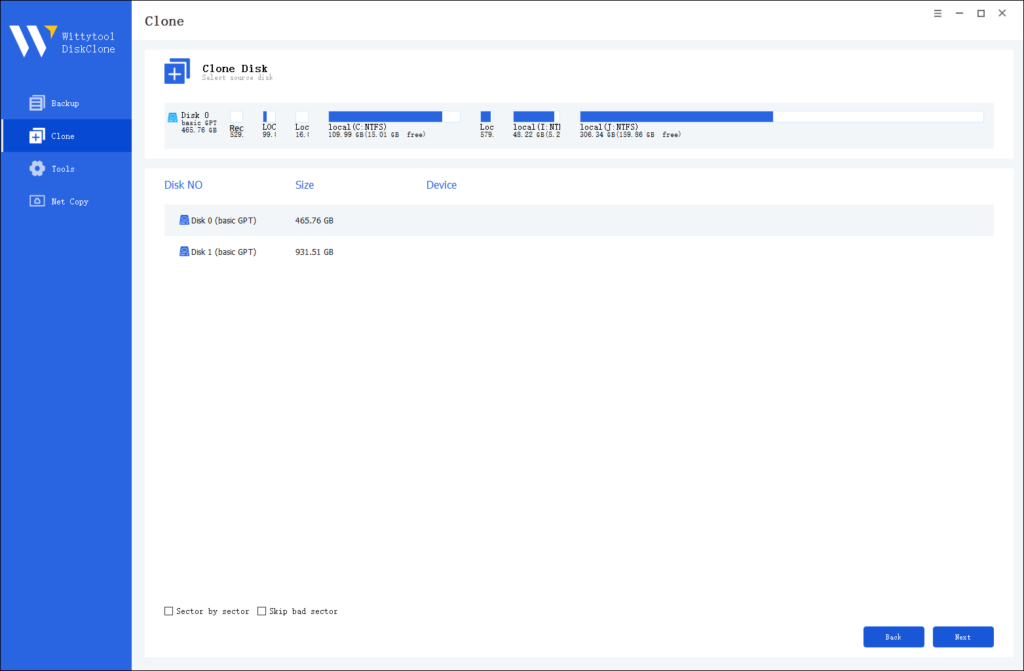
Step 2: Choose Source Disk
Pick the disk from the list view. The layout of the selected disk will be displayed at the top of the list view.

Note:
*Sector by Sector: This option should be selected if the source disk has bad sectors or if the file system on the disk is damaged. It ensures that all sectors on the source disk are cloned.
*Skip Bad Sectors: If the source disk has bad sectors, select this option. Wittytool DiskClone will ignore the bad sectors and clone only the undamaged ones. This method is suitable for older disks that may have bad sectors.
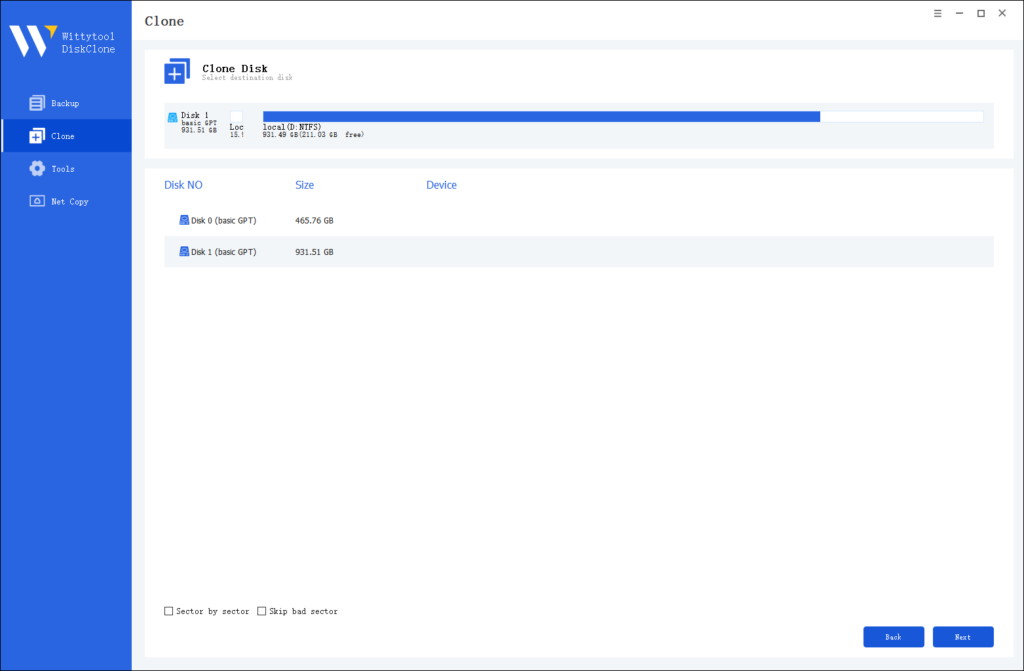
Step 3: Choose Destination Disk
Select the target disk.

Step 4: Resize Partition and Start Cloning
You can resize the partition on the target disk if needed. Click the “Start Clone” button to begin the cloning process.

Why Do You Clone NVMe to NVMe SSD?
Upgrading to a faster or higher-capacity SSD can significantly boost your computer’s performance, especially if you’re moving to a modern NVMe drive. But why go through the effort to clone instead of starting fresh? The answer is simple: cloning saves time and ensures a smooth transition without losing valuable data or reconfiguring your system.
When you learn how to transfer SSD to new NVMe, you avoid the hassle of reinstalling your operating system, applications, and personal files. This is particularly helpful if you’ve spent hours customizing your setup or storing essential data. Cloning replicates your existing drive exactly, so you can continue working or gaming as if nothing has changed.
Another reason to consider cloning is to address specific issues, like resolving a new NVMe SSD internet issue. In some cases, upgrading can fix compatibility problems that slow down your system or cause network interruptions. Instead of troubleshooting endlessly, transferring your data to a new NVMe SSD might be the better solution.
Conclusion
Cloning to a NVMe SSD is a practical solution for upgrading your storage without losing data or reinstalling your operating system. Whether you’re transitioning from an SSD MVMe to a normal NVMe or simply upgrading to a faster, higher-capacity drive, the process is straightforward with the right tools.
Using an SSD M.2 HDD docking station with cloner simplifies the cloning experience, allowing you to connect both drives effortlessly. Pair this hardware with reliable cloning software – Wittytool DiskClone, and you’ll have a seamless transfer in no time.
By following the steps and tips outlined in this guide, you can upgrade your system confidently, knowing your data is secure and ready to go. Ready to experience faster speeds and more storage? Start your NVMe cloning journey today and enjoy the benefits of your upgraded SSD!

