Struggling to reset your PC or perform a “Fresh Start” because the Recovery partition is missing? You’re not alone! Many Windows users face this issue, especially after reinstalling the operating system. It can be frustrating to realize that even after reinstalling Windows 10 or 11, the recovery partition—essential for restoring your system—didn’t appear as expected.
The absence of this partition can leave you wondering how to fix it and regain the ability to quickly reset or repair your PC. The good news is that you can manually recreate it without starting from scratch. This guide will show you how to create recovery partition with 2 methods, ensuring you have a reliable fallback option when you need to troubleshoot or refresh your system. Ready to bring your recovery partition back? Let’s dive in!
Why You Need a Recovery Partition
A recovery partition is an essential component of your computer’s system that can save you from major headaches when something goes wrong. This hidden partition stores tools and files that allow you to troubleshoot problems, reset your PC, or even reinstall Windows without needing external media. But why is this partition so critical, and what happens if it’s missing?
First, a recovery partition acts as a safety net. If your system crashes or becomes unstable due to malware or corrupted files, you can use the recovery partition to access built-in tools for repairs or restoration. It eliminates the need to create a bootable USB drive or hunt for your original installation media.
Second, this partition is crucial for creating a system image – a complete snapshot of your current system configuration, including all installed programs and settings. A system image allows you to restore your PC exactly as it was, making it easier to recover from issues without losing personalized configurations.
Without a recovery partition, troubleshooting becomes more complicated and time-consuming. That’s why recreating it is essential, especially after reinstalling Windows. In the next section, we’ll show you exactly how to bring back this critical feature and keep your PC prepared for any situation.
Method 1. Auto Recreate a Recovery Partition in Windows 10/11
Recreating a recovery partition doesn’t have to be complicated, especially if you have the right tools. With Wittytool DiskClone, the FIRST software which really support the function of recreating recovery partition, you can effortlessly manage recovery partition creation while also handling other critical disk tasks like upgrades or backups. Whether you’ve reinstalled Windows or need to replace my HDD with a new drive, Wittytool DiskClone simplifies the entire process. Don’t hesitate to download and follow the steps below to get started!
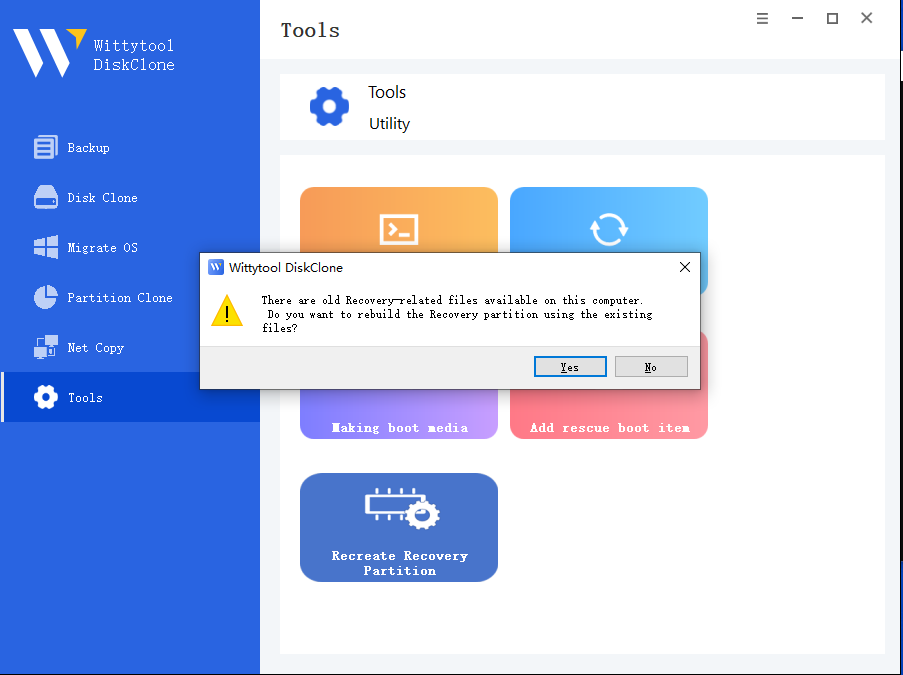
Step 1. Open the software and in the Tools section, find and click on the recreate recovery partition feature.
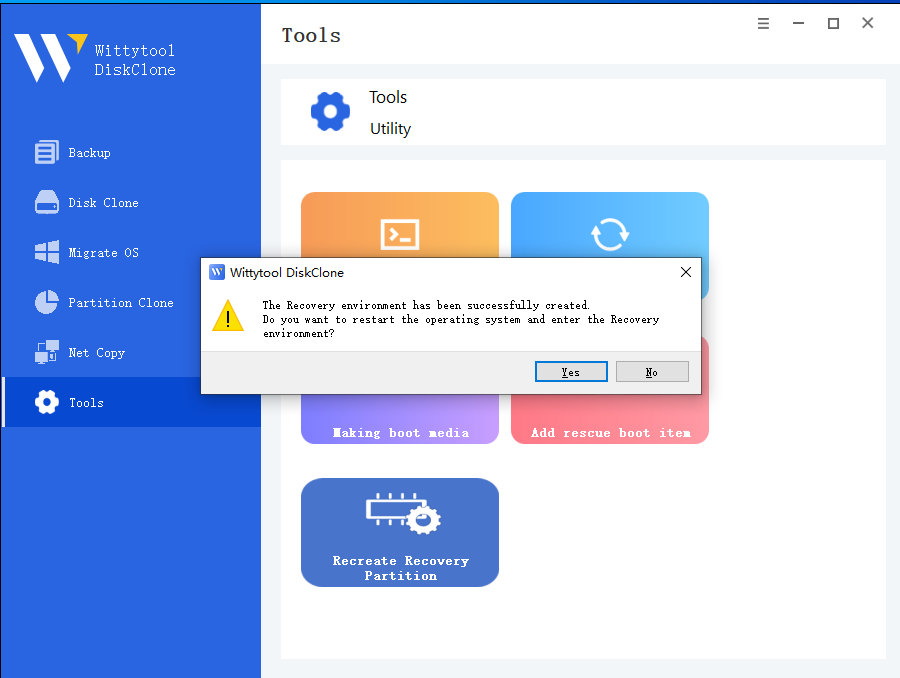
Step 2. If the relevant file exists on the system, you will be prompted, and if you select “Yes”, you will use the system file to create it.

After successful creation, you can reboot the system into Recovery mode as prompted.

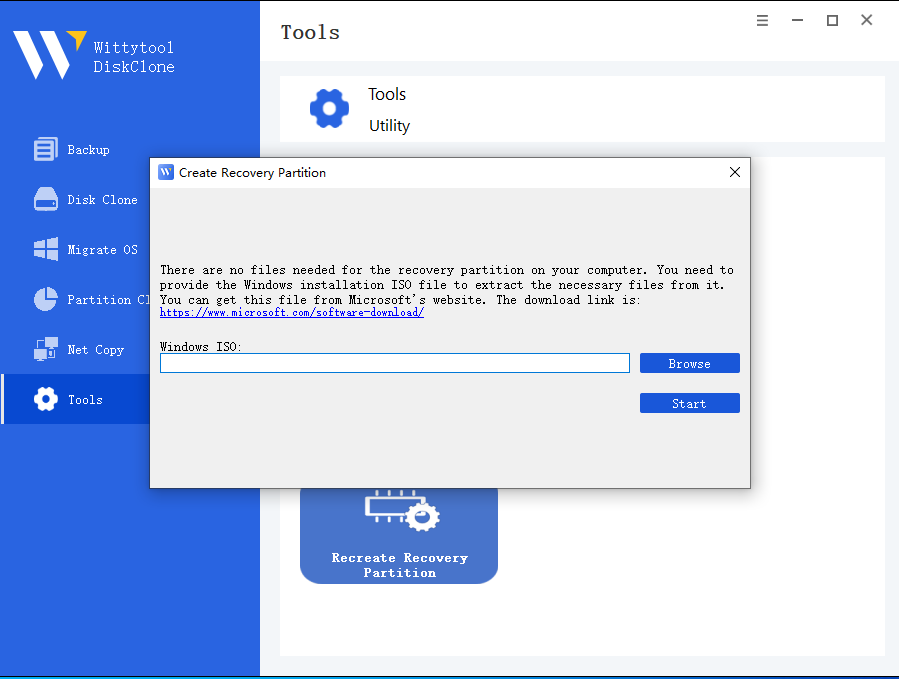
Step 3. If you can’t find your recovery partition, you can create it with the Windows Installation ISO.

After successfully creating it, you can reboot the system into Recovery mode as instructed.
Wittytool DiskClone’s user-friendly approach makes this process straightforward, ensuring your system is ready for resets or repairs whenever needed. With this tool, you can restore a vital safety feature to your computer with minimal effort!
Method 2. Recreate Manuelly a Recovery Partition in Windows 10/11
Manually Recreate a Recovery Partition in Windows 10/11″ describes the process of rebuilding the recovery partition on a Windows 10 or 11 system without using automated tools. This involves manually creating the partition, assigning it the appropriate size and type, and configuring it to serve as a recovery environment, ensuring the system can be restored in case of issues.
Step 1: Shrink the Volume in Disk Management
- Press the Windows key and search for “Disk Management.”
- Right-click on C: (or the boot and primary partition).
- Select Shrink Volume…
- In the “Enter the amount of space to shrink in MB” field, input 1024.
- Click Shrink.
Step 2: Create a New Simple Volume
- Right-click on the newly created unallocated space.
- Select New Simple Volume.
- Click Next twice.
- Select Do not assign a drive letter or drive path, then click Next.
- Format the volume with these settings:
- Volume label: System Reserved
- Click Next, then Finish.
Step 3: Locate or Restore Winre.wim
- Open File Explorer and navigate to
C:\Windows\System32\Recovery.- If
Winre.wimis not visible:- Open Command Prompt in administrator mode.
- Run
reagentc /info. If Windows Recovery is enabled, runreagentc /disable. - If still not visible, proceed to the next step.
- In File Explorer, go to the View tab, right-click, and check Hidden items.
- Click Options, then the View tab, and uncheck Hide protected operating system files (Recommended).
- If
Winre.wimis still missing:- Obtain a new copy of
Winre.wim:- For a USB Windows installation image:
- Navigate to the Sources folder and right-click on
install.esd. - Use 7-Zip to select Open Archive.
- Navigate to folder
1\Windows\System32\Recovery. - Copy the files to
C:\Recovery\WindowsRE.
- Navigate to the Sources folder and right-click on
- For a Windows ISO:
- Extract the files and follow the same steps as for the USB.
- For a USB Windows installation image:
- Obtain a new copy of
- If
Step 4: Configure the New System Reserved Partition
- Determine the Partition Style:
- Open Disk Management.
- Right-click on Disk 0 (or the disk containing the OS).
- Select Properties, then go to the Volumes tab.
- Note the Partition Style (GPT or MBR).
- Open Command Prompt in administrator mode and enter the following commands:
diskpartlist dissel dis 0lis parsel par 3(select the newly created partition)det par(verify the correct partition is selected)
- Set the Partition ID:
- For MBR:
set id=27 - For GPT:
set id=de94bba4-06d1-4d40-a16a-bfd50179d6ac
- For MBR:
- Verify the Partition Type Change:
- Run
det parand confirm the changes. - Type
exitto leave DiskPart.
- Run
- Enable the Recovery Environment:
- Run
reagentc /enable. - Verify the configuration using
reagentc /infoto ensure the Windows Recovery Environment (WinRE) is located on the correct partition.
- Run
Conclusion
When it comes to recreating a recovery partition, the auto recreate option with Wittytool DiskClone is by far the most effective and efficient solution. Unlike the manual creation method, which can be complicated and requires advanced computer knowledge, Wittytool simplifies the process with just a few clicks. It’s the ideal choice for those who want to restore their recovery partition quickly without diving into technical details.


Comments (1)
Comments are closed.