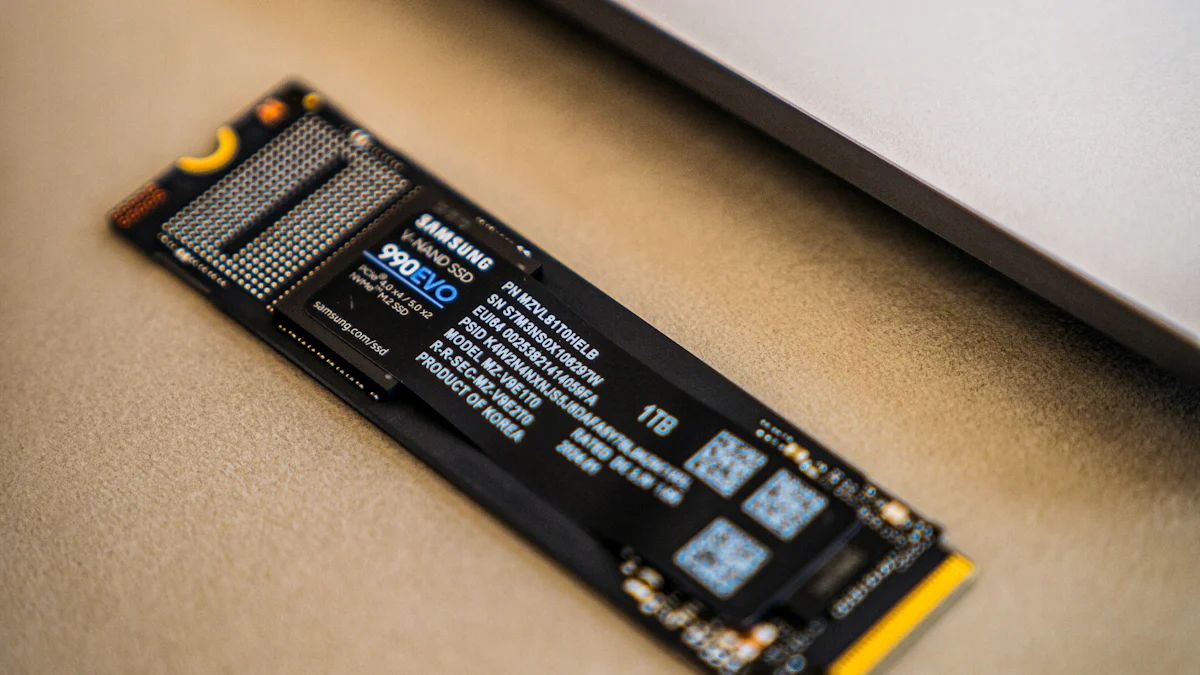
In 2025, you might wonder how to install Windows 7 on NVMe SSD. Despite its age, Windows 7 remains popular for its simplicity and reliability. However, installing it on modern NVMe SSD presents challenges due to compatibility issues. Yet, the benefits are undeniable. NVMe SSD offer blazing speeds, about three times faster than traditional SSD, enhancing your system’s performance significantly. Let’s find the following ways to install Windows 7 on NVMe SSD.
You can also read: Cloned SSD Won’t Boot? 2025 Tips to Make It Bootable
Preparation Steps for Installing Windows 7 on NVMe SSD

Before diving into the installation process, you need to prepare your system and gather the necessary tools. This ensures a smooth and successful installation of Windows 7 on your NVMe SSD.
Check System Compatibility
- Verify hardware requirements for NVMe SSD: First, confirm that your motherboard supports NVMe SSD. Most modern motherboards do, but it’s crucial to check your system’s manual or specifications. Look for support for PCIe/NVMe SSD form factors, such as PCIe (Add-In Card), M.2, or U.2.
- Ensure BIOS/UEFI support for NVMe: Your system’s BIOS or UEFI must support NVMe drives. Check if your BIOS version is UEFI 2.3.1 or later, as this is typically required for NVMe support. If your system is older, you might need to update the BIOS to enable NVMe compatibility.
Gather Necessary Tools and Software
- Obtain Windows 7 installation media: You need a Windows 7 installation disc or a bootable USB drive. If you don’t have one, you can create a bootable USB using the Windows 7 ISO file and a tool like Rufus.
- Download NVMe drivers and updates: Since Windows 7 doesn’t natively support NVMe drives, you must download the appropriate NVMe drivers from your SSD manufacturer’s website. Save these drivers on a USB drive so you can load them during the installation process.
Backup Important Data with WittyTool DiskClone
- Use external storage solutions: Before proceeding, back up all important data. Use an external hard drive or cloud storage to ensure your files are safe.
- Create a system image using WittyTool DiskClone: WittyTool simplifies the backup process. It allows you to clone your entire hard drive, including the operating system, files, and settings. This step is crucial for data protection and ensures you can restore your system if needed.
By following these preparation steps, you set the stage for a successful installation of Windows 7 on your NVMe SSD. With the right tools and a bit of patience, you’ll soon enjoy the enhanced performance that NVMe SSD offer.
How to Install Windows 7 on NVMe SSD
Installing Windows 7 on an NVMe SSD can seem daunting, but with the right approach, you can make it a breeze. Let’s walk through the steps to get your system up and running smoothly.
Methode 1. Best Way – Clone Windows 7 to NVMe SSD
Cloning your existing Windows 7 installation to an NVMe SSD is the most efficient method. This approach saves you from the hassle of a fresh installation and ensures all your settings and files remain intact, for example, install Windows 10/11 after replacing hard drive. To do this, you’ll need reliable disk cloning software. WittyTool DiskClone is an excellent choice for this task. It simplifies the process, allowing you to clone your entire hard drive, including the operating system, applications, and personal files, with minimal effort.
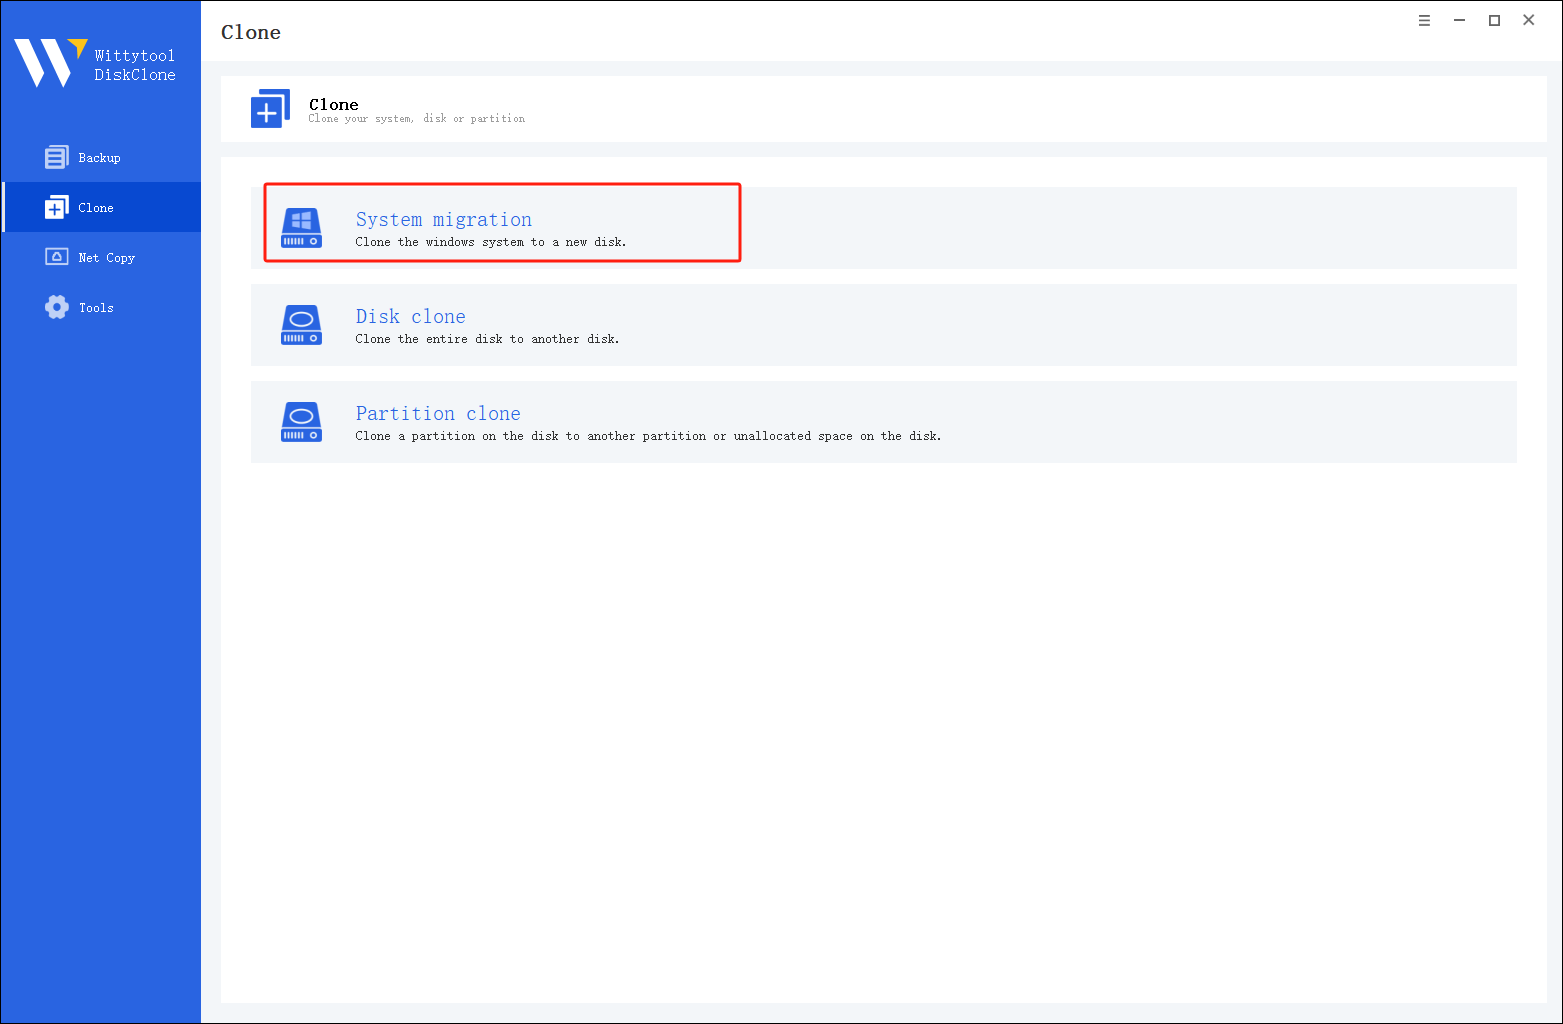
Step 1: Select System Migration Mode
Access the clone page by clicking the left panel, then choose the System migration mode.
Step 2: Select Destination Disk
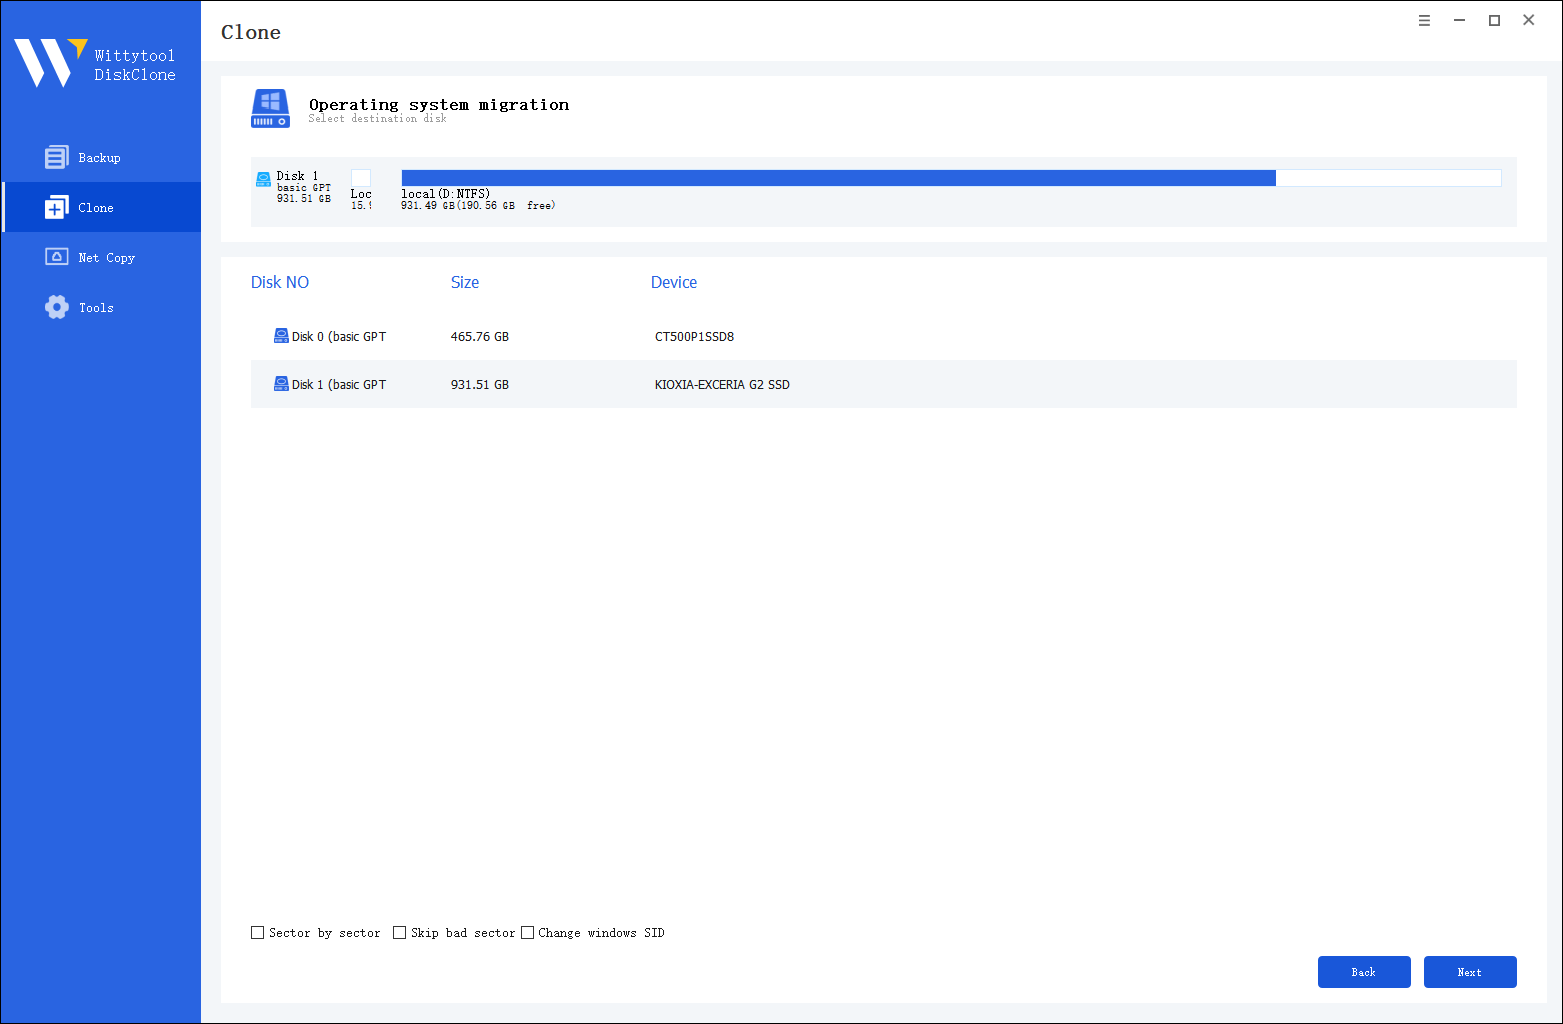
Choose the destination disk from the list. The layout of the selected disk will appear at the top of the list.
Note:
*Sector by Sector: Select this option if the source disk has bad sectors or a damaged file system. This ensures all sectors of the source disk are cloned.
*Skip Bad Sectors: If the source disk contains bad sectors, choose this option. Wittytool DiskClone will bypass the damaged sectors and clone only the intact ones, making it ideal for older disks with bad sectors.
*Change Windows SID: When cloning multiple machines on the same network, select “Change Windows SID” to prevent security issues related to network access.
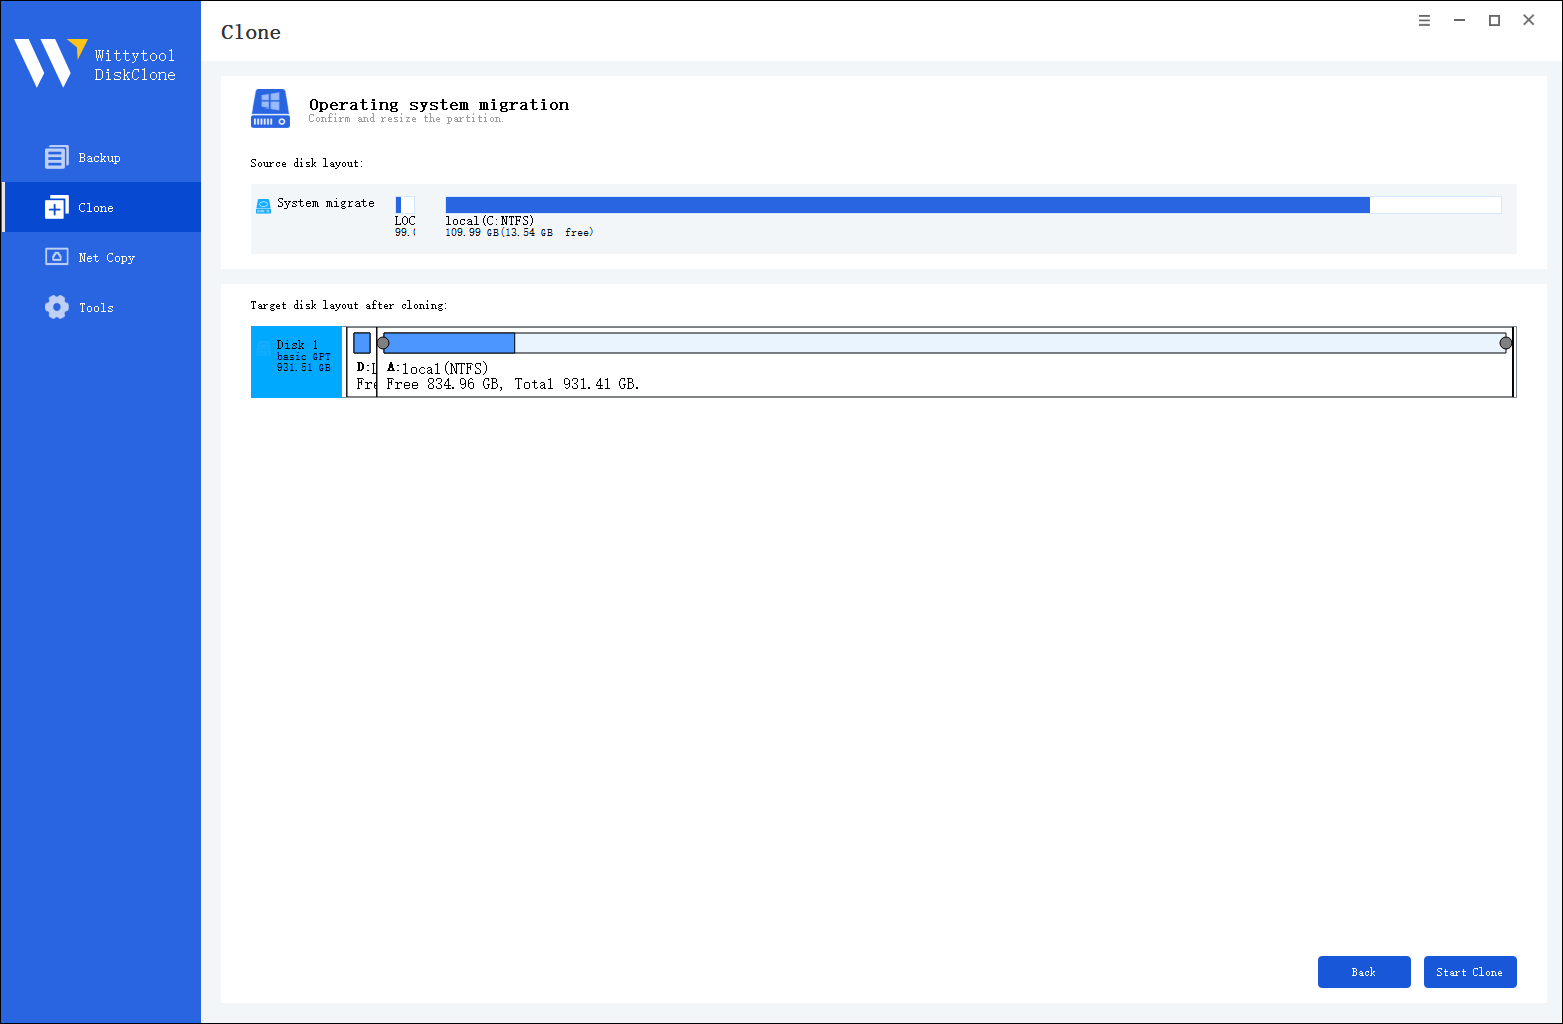
Step 3: Confirm Partition Size
Review and resize the partitions on the target disk as needed. Once ready, click the “Start Clone” button to begin the cloning process. After cloning is complete, set the target disk as the boot disk in the BIOS and boot the system from it.
Read Also: Cloning vs Migrating OS: Understanding the Key Differences
Methode 2. Install Windows 7 on NVMe SSD Manually
Step 1. Configure BIOS/UEFI Settings
Before you boot from your newly cloned NVMe SSD, you need to adjust some settings in your BIOS or UEFI.
Firstly, enable AHCI mode for NVMe support
AHCI mode is crucial for NVMe support. Here’s how you can enable it:
- Restart your computer and enter the BIOS/UEFI setup. This usually involves pressing a key like F2, F10, or Delete during startup.
- Navigate to the storage configuration section.
- Set the SATA mode to AHCI if it’s not already selected.
Then, Set boot priority to installation media
To ensure your system boots from the correct drive, adjust the boot priority:
- In the BIOS/UEFI setup, find the boot order settings.
- Set the NVMe SSD as the primary boot device.
Step 2. Install Windows 7 on NVMe SSD
If you prefer a fresh installation instead of cloning, follow these steps to install Windows 7 directly onto your NVMe SSD.
First of all, boot from installation media
- Insert your Windows 7 installation disc or USB drive.
- Restart your computer and boot from the installation media. You might need to press a key like F12 to access the boot menu.
Then, Load NVMe drivers during setup
Windows 7 doesn’t natively support NVMe drives, so you’ll need to load the drivers manually:
- During the installation process, when prompted to select a drive, click on “Load Driver.”
- Insert the USB drive containing the NVMe drivers and follow the prompts to load them.
By following these steps, you can successfully install Windows 7 on an NVMe SSD. Whether you choose to clone your existing system or perform a fresh installation, you’ll enjoy the enhanced performance that NVMe SSD offer. Remember, patience and attention to detail are key to a smooth installation process.
Step 3. Complete Installation Process
You’ve reached the final stretch of installing Windows 7 on your NVMe SSD. Now, it’s time to wrap up the installation and get everything running smoothly. Let’s dive into the last steps.
Firtstly, set up user accounts and preferences
- Create User Accounts: After the installation completes, you’ll need to set up user accounts. This step is crucial for personalizing your system and ensuring security. Follow the on-screen prompts to create a primary user account. You can add more accounts later if needed.
- Customize Preferences: Once your account is ready, customize your system preferences. Adjust settings like display resolution, power options, and system sounds to suit your needs. Personalizing these settings enhances your user experience and makes your system feel like home.
After, install essential updates and drivers
- Install Windows Updates: Keeping your system updated is vital for security and performance. Connect to the internet and run Windows Update to download and install the latest patches and updates. This step ensures your system has the latest security features and bug fixes.
- Load Essential Drivers: After updating Windows, focus on installing essential drivers. Start with the NVMe SSD drivers if you haven’t already loaded them during installation. Then, proceed with drivers for your graphics card, network adapter, and other hardware components. Visit the manufacturer’s website for the latest versions.
- Optimize System Performance: With everything set up, consider optimizing your system for better performance. Adjust settings like virtual memory and disable unnecessary startup programs. These tweaks can enhance your system’s speed and responsiveness.
By following these steps, you complete the installation process and ensure your system runs efficiently. Whether you’re cloning or performing a fresh installation, knowing how to install Windows 7 on NVMe SSD equips you with the skills to tackle future upgrades. Enjoy the speed and reliability that your NVMe SSD brings to your Windows 7 experience!
Troubleshooting and Optimization
Even with careful preparation, you might encounter some hiccups while installing Windows 7 on an NVMe SSD. Let’s tackle these common issues and optimize your system for the best performance.
Common Installation Issues
NVMe drive not detected during installation
Sometimes, your NVMe drive might not show up during the installation process. This can be frustrating, but don’t worry. Here’s what you can do:
- Check Connections: Ensure that your NVMe SSD is properly seated in its slot. A loose connection can prevent detection.
- Load Drivers: Make sure you’ve loaded the correct NVMe drivers. During installation, select “Load Driver” and point to the USB drive where you’ve saved the drivers.
- BIOS Settings: Double-check your BIOS settings. Confirm that NVMe support is enabled and that the drive is recognized in the BIOS.
Installation freezes or encounters errors
If your installation freezes or you encounter errors, try these steps:
- Verify Installation Media: Ensure your Windows 7 installation media is not corrupted. You might need to recreate your bootable USB drive.
- Check RAM: Faulty RAM can cause installation issues. Run a memory test to rule out this possibility.
- Update BIOS: An outdated BIOS can lead to compatibility issues. Visit your motherboard manufacturer’s website for the latest BIOS update.
Post-Installation Optimization
Once you’ve successfully installed Windows 7 on your NVMe SSD, it’s time to optimize your system for peak performance.
Update drivers and firmware for NVMe SSD
Keeping your drivers and firmware up-to-date is crucial for stability and speed:
- Visit Manufacturer’s Website: Download the latest NVMe drivers and firmware updates from your SSD manufacturer’s website.
- Install Updates: Follow the instructions provided to install these updates. This ensures your SSD operates efficiently and reliably.
Optimize SSD performance settings for Windows 7
To get the most out of your NVMe SSD, tweak some settings in Windows 7:
- Disable Disk Defragmentation: SSD don’t require defragmentation. Go to the Disk Defragmenter tool and turn off scheduled defragmentation for your SSD.
- Enable TRIM: TRIM helps maintain SSD performance over time. Open Command Prompt as an administrator and type
fsutil behavior set DisableDeleteNotify 0to enable TRIM. - Adjust Power Settings: Set your power plan to “High Performance” to prevent your SSD from entering low-power states that can affect speed.
Conclusion
You’ve now mastered the process of installing Windows 7 on an NVMe SSD. From checking system compatibility to optimizing performance, each step ensures a smooth transition to faster storage. Remember, tools like Wittytool DiskClone can simplify this journey, offering seamless data migration and backup solutions. As you explore further, consider the broader implications of storage upgrades. It’s not just about speed; think about power consumption and return on investment. Make informed decisions that align with your needs. Enjoy the enhanced performance and reliability your NVMe SSD brings to your Windows 7 experience!

