Introduction
Are you tired of your laptop dragging its feet, and considering an upgrade? You might be worried about losing precious data during the transition. That’s a common concern! The truth is, you can replace your laptop hard drive without losing data.

Imagine seamlessly upgrading your hard drive to an SSD, boosting your laptop’s performance without the stress of data loss. In this guide, we’ll explore how to replace a laptop hard drive without losing data with a free disk clone tool, focusing on effective strategies to take out a laptop hard drive safely. We’ll also tackle the pressing question: can you really replace a hard drive without losing data and reinstalling Windows? Stick with us to discover practical steps that keep your information secure while giving your laptop a fresh start!
How To Replace Laptop Hard Drive Without Losing Data
Firstly. Move Data From The Old Drive To The New One
Free disk cloning software fastest – Wittytool DiskClone is your best friend when you want to replace a laptop hard drive to SSD without losing data and reinstalling Windows. This tool creates an exact copy of your existing hard drive, including all files, settings, and the operating system. Imagine moving everything from one house to another without leaving anything behind, that’s what cloning does for your data. By the way, you can repair Western Digital HDD easily with this software. Now download it and transfer your data step by step.
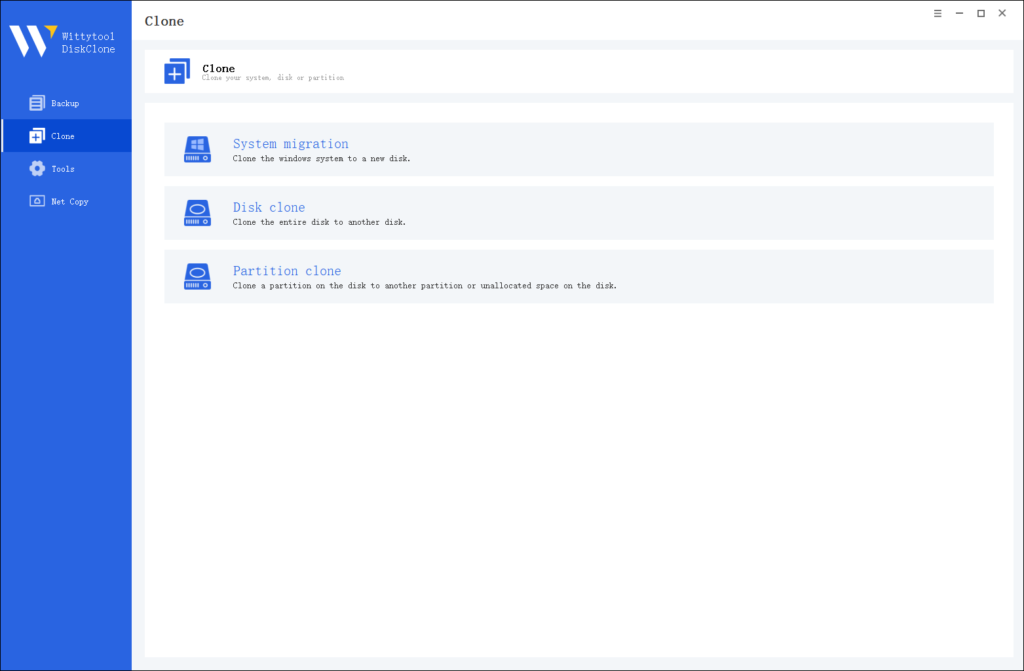
Step 1: Choose Disk Clone Mode
Click on the left panel to access the clone page, then select the disk clone mode.

Note:
During usage, choose the corresponding mode according to your needs. You can read this article about system clone vs system migration to understand the differences in different usage scenarios.
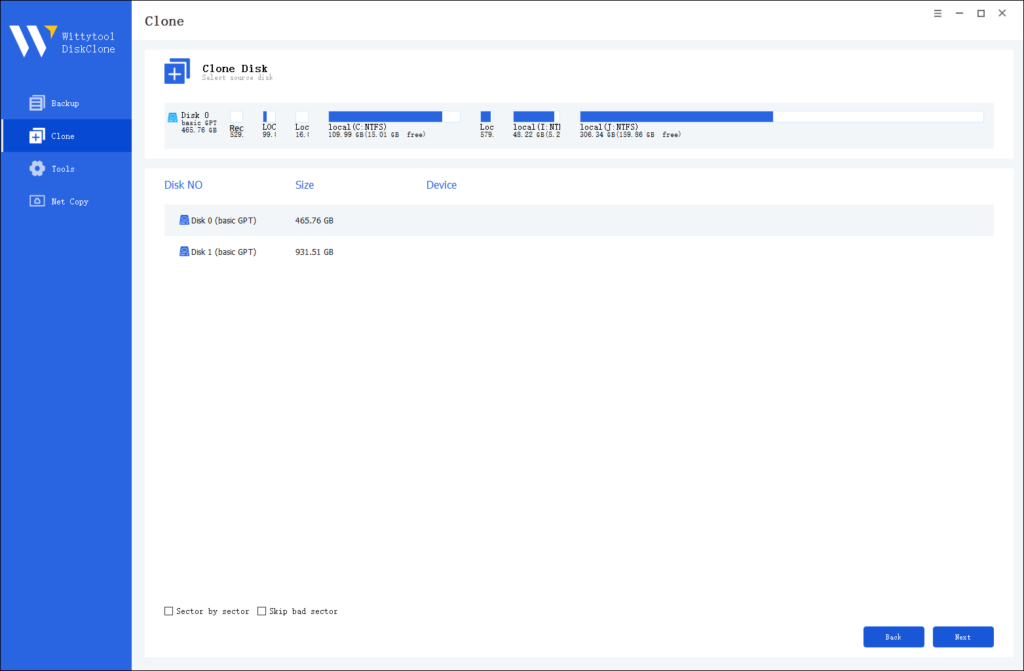
Step 2: Choose Source Disk
Pick the disk from the list view. The layout of the selected disk will be displayed at the top of the list view.

Note:
*Sector by Sector: This option should be selected if the source disk has bad sectors or if the file system on the disk is damaged. It ensures that all sectors on the source disk are cloned.
*Skip Bad Sectors: If the source disk has bad sectors, select this option. Wittytool DiskClone will ignore the bad sectors and clone only the undamaged ones. This method is suitable for older disks that may have bad sectors.
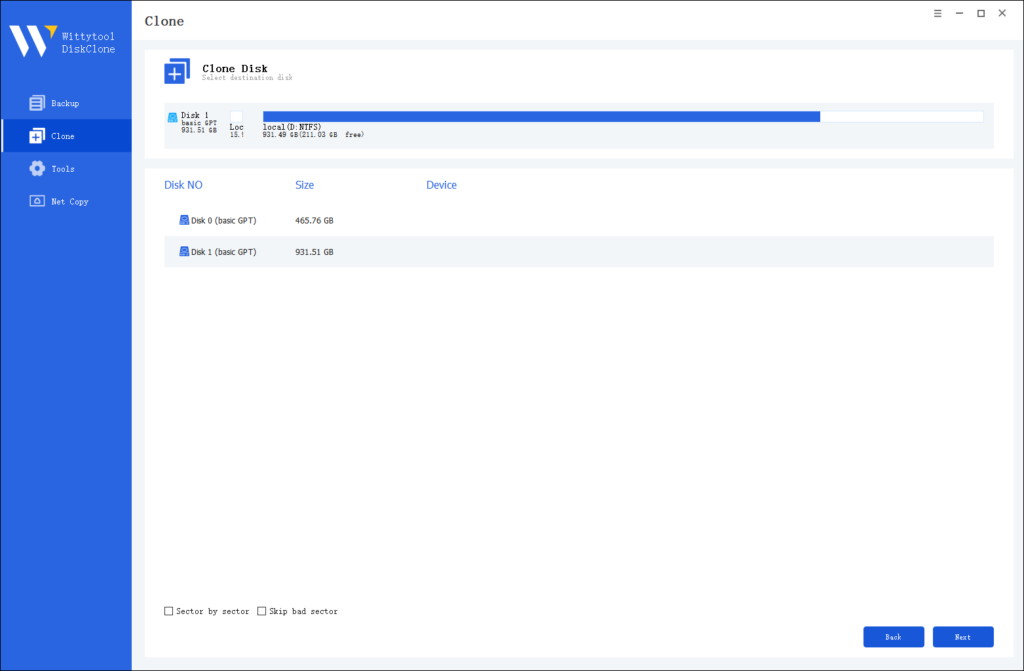
Step 3: Choose Destination Disk
Select the target disk.

Step 4: Resize Partition and Start Cloning
You can resize the partition on the target disk if needed. Click the “Start Clone” button to begin the cloning process.

Secondly, Physically Replacing the Hard Drive

Ready to get hands-on with your laptop? Let’s dive into the physical replacement of your hard drive. This process might sound daunting, but it’s easier than you think. Follow these steps, and you’ll know how to replace a laptop hard drive without losing data and reinstalling Windows.
Opening Your Laptop Safely
First things first, power down your laptop. Unplug the charger and remove the battery if possible. You don’t want any power running through the device while working on it. Gather your screwdriver set. Most laptops require a Phillips-head screwdriver.
- Locate the Screws: Flip your laptop over. Look for screws securing the bottom panel. These usually surround the edges.
- Remove the Screws: Carefully unscrew each one. Keep them in a safe place. You don’t want to lose any tiny pieces.
- Open the Panel: Gently pry open the panel. Use a plastic tool to avoid scratching the surface. Lift it away to reveal the internal components.
Removing the Old Hard Drive
Now that you’ve opened the laptop, it’s time to remove the old hard drive.
- Identify the Hard Drive: Look for a rectangular component. It’s usually secured by a bracket or screws.
- Unscrew the Bracket: Remove any screws holding the hard drive in place. Keep these screws separate from the others.
- Disconnect the Drive: Gently pull the hard drive away from the SATA connector. Avoid using excessive force. The drive should slide out smoothly.
Installing the New SSD
With the old drive out, you’re ready to install the new SSD. This step is crucial for boosting your laptop’s performance.
- Position the SSD: Align the new SSD with the SATA connector. Make sure it’s facing the right direction.
- Connect the SSD: Slide the SSD into the connector. Ensure a snug fit. You don’t want a loose connection.
- Secure the SSD: Use the screws from the old drive to secure the SSD. Tighten them just enough to hold the drive in place.
- Close the Panel: Place the bottom panel back on the laptop. Screw it in securely. Double-check that everything is tight.
Congratulations! You’ve successfully changed the hard disk in your laptop. Power on your laptop and enjoy the speed boost from your new SSD.
Conclusion
You now know how to replace a laptop hard drive without losing data and reinstalling Windows. The process involves using reliable cloning software, and handling the physical replacement with care. Enjoy the benefits of your new SSD. Experience faster boot times and improved performance.
FAQs and Additional Tips
Addressing Common Concerns
Replacing a laptop hard drive can seem daunting. Many people worry about losing data or reinstalling Windows. You can avoid these issues by using cloning software. Cloning creates an exact copy of your current hard drive. This process ensures that all files, settings, and the operating system transfer to the new SSD.
Some users ask if SSDs are reliable. SSDs offer greater durability than HDDs. No moving parts mean fewer mechanical failures. However, SSDs have limited write cycles. Regular backups are essential. Use tools like CrystalDiskInfo to monitor SSD health. This software provides insights into the lifespan of your storage device.
Another common question involves compatibility. Before purchasing an SSD, check your laptop’s specifications. Ensure that the SSD fits your laptop’s drive bay. Most laptops use a 2.5-inch drive bay. Confirm that the SSD uses the correct interface, such as SATA or M.2 PCIe.
Bonus Tips for Maintenance
Maintaining your SSD ensures optimal performance. Follow these tips to extend the lifespan of your SSD:
- Monitor Temperature: Keep your laptop cool. Overheating can reduce SSD lifespan. Use cooling pads or fans to maintain a stable temperature.
- Enable TRIM: TRIM helps manage unused data blocks. This feature maintains SSD speed over time. Ensure TRIM is enabled on your system.
- Avoid Forced Shutdowns: Never force a shutdown. This action risks data corruption. Always shut down your laptop properly.
- Regular Backups: Backup your data regularly. Use external drives or cloud storage. This practice protects against data loss.
- Check Firmware Updates: Manufacturers release firmware updates. These updates improve performance and fix bugs. Check for updates periodically.
- Use SSD Management Tools: Tools like Kingston SSD Manager help monitor SSD health. These tools provide detailed reports and status updates.

