Cloning your disk in Windows 11 can seem like a daunting task, but it’s actually one of the best ways to upgrade your storage or back up your entire system. Whether you’re moving from an old hard drive (HDD) to a faster solid-state drive (SSD) or just need to back up your files and settings, disk cloning makes the entire process seamless. Instead of reinstalling your operating system and programs, free disk cloning software allows you to transfer your OS, applications, and personal files exactly as they are, saving you time and avoiding any risk of data loss.
The process of cloning a disk in Windows 11 involves copying all the content from one drive to another, ensuring that your new disk is bootable and fully functional. Fortunately, there are a few reliable tools available to help with this task. In this article, we’ll explore two easy and effective ways to clone a disk in Windows 11, both of which guarantee a smooth migration with minimal effort.
Solution 1: WittyTool DiskClone – The Perfect Tool for Disk Cloning in Windows 11
One of the easiest and most reliable solutions for cloning a disk in Windows 11 is WittyTool DiskClone. This powerful tool simplifies the cloning process and ensures that your new disk is an exact replica of your current one, complete with your OS, settings, and files. WittyTool DiskClone supports a wide range of disk types, including both HDDs and SSDs, making it an excellent choice for any upgrade.
Key Features of WittyTool DiskClone:
- Fast Cloning Process: WittyTool DiskClone provides a fast and efficient way to clone your disk, whether you’re moving to a larger HDD or upgrading to an SSD.
- Bootable Clones: The cloned disk is fully bootable, meaning you can start up your system directly from the new drive without needing to reinstall Windows 11.
- Easy-to-Use Interface: The user-friendly interface allows both beginners and advanced users to easily navigate through the cloning process without hassle.
- Full Disk or Partition Cloning: Choose to clone your entire disk or select specific partitions, depending on your needs.
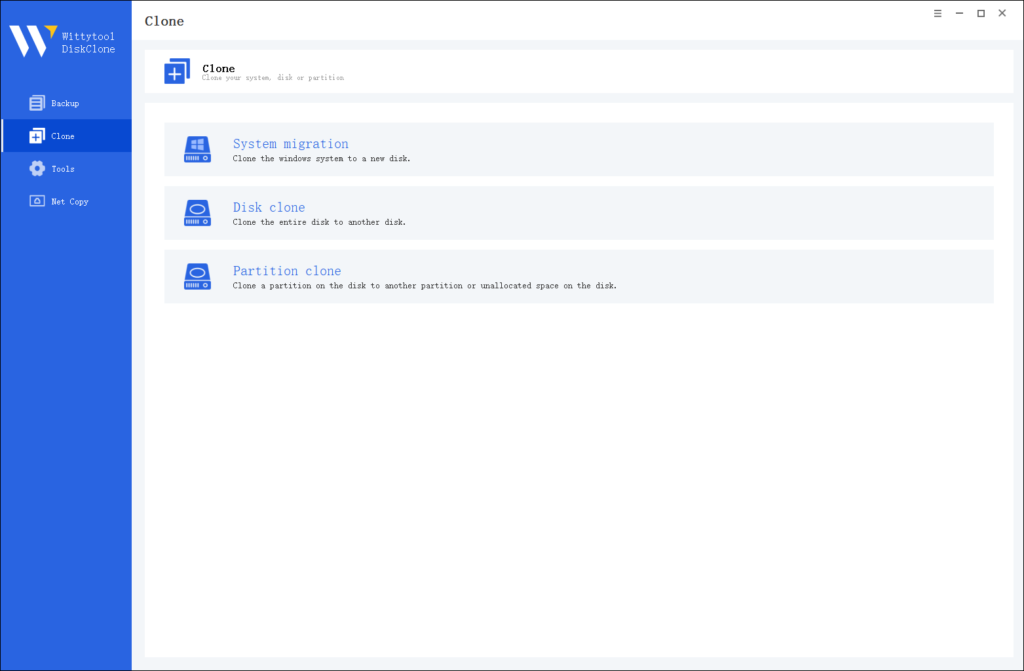
Step 1: Choose Disk Clone Mode
Click on the left panel to access the clone page, then select the disk clone mode.

Note:
During usage, choose the corresponding mode according to your needs. You can read this article about system clone vs system migration to understand the differences in different usage scenarios.
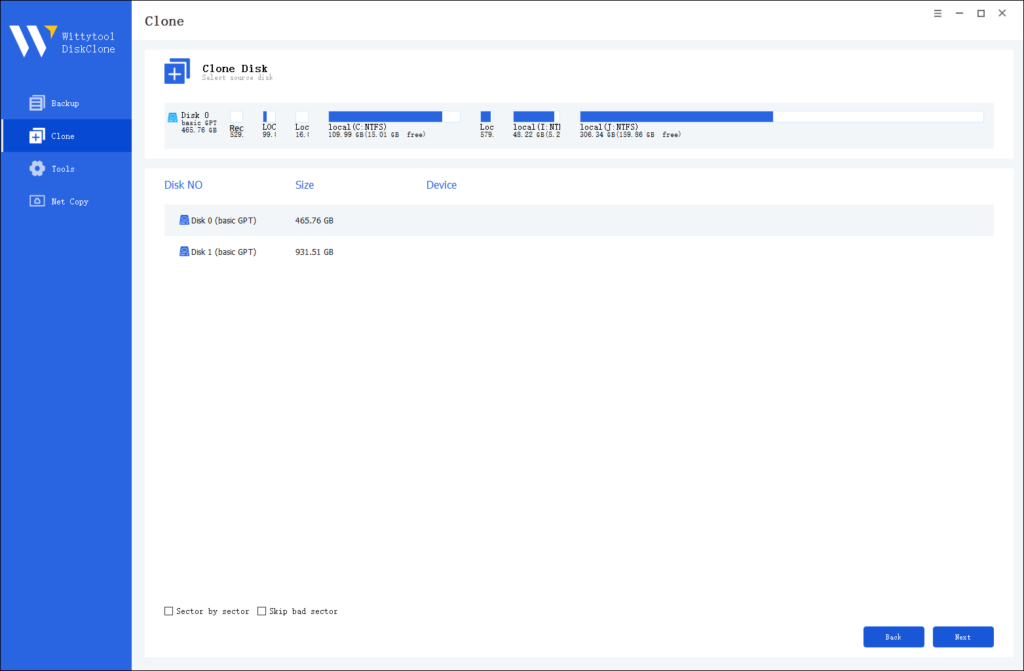
Step 2: Choose Source Disk
Pick the disk from the list view. The layout of the selected disk will be displayed at the top of the list view.

Note:
*Sector by Sector: This option should be selected if the source disk has bad sectors or if the file system on the disk is damaged. It ensures that all sectors on the source disk are cloned.
*Skip Bad Sectors: If the source disk has bad sectors, select this option. Wittytool DiskClone will ignore the bad sectors and clone only the undamaged ones. This method is suitable for older disks that may have bad sectors.
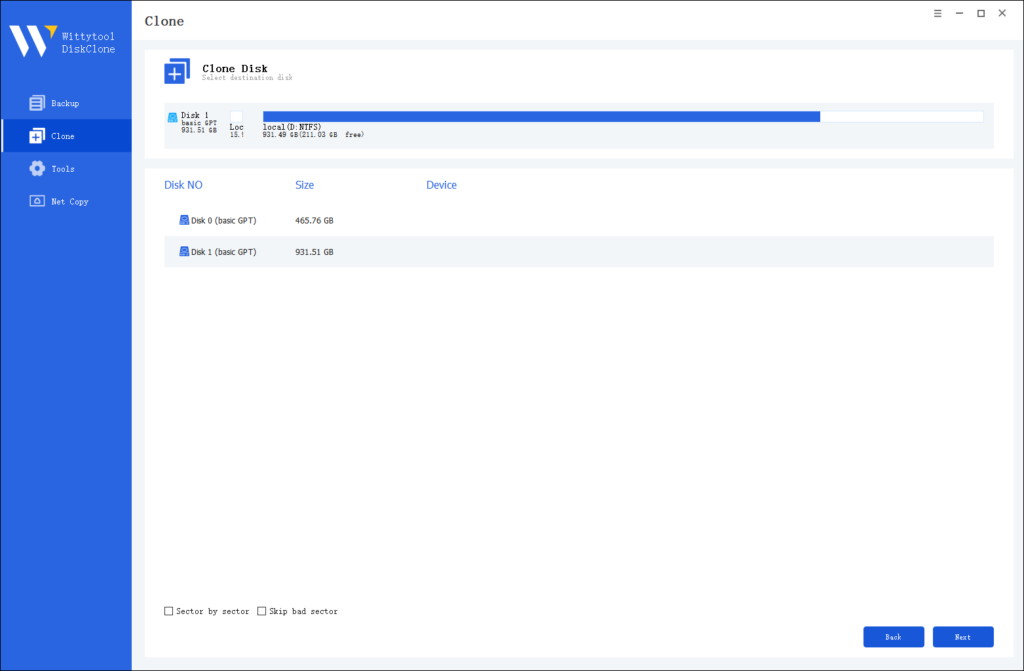
Step 3: Choose Destination Disk
Select the target disk.

Step 4: Resize Partition and Start Cloning
You can resize the partition on the target disk if needed. Click the “Start Clone” button to begin the cloning process.

Solution 2: Using Windows Built-in Backup and Restore Tool
While third-party software like WittyTool DiskClone offers many advanced features, Windows 11 also includes a built-in tool that can assist with cloning a disk in a more basic sense: the Backup and Restore tool. Though this method doesn’t offer the same level of control or speed as disk cloning software, it can still be useful for creating a backup of your system before replacing a drive.
Key Features of the Windows Backup Tool:
- System Image Backup: Windows 11’s built-in backup tool allows you to create a full system image, which is essentially a snapshot of your entire system, including the OS, applications, and files.
- Restore from Backup: If anything goes wrong with the cloning process or if you need to restore your system, the backup tool allows you to easily revert your system to its previous state.
Step-by-Step Guide: How to Clone a Disk in Windows 11 Using Windows Backup and Restore
- Open Backup Settings: In the Windows 11 Start menu, search for “Backup settings” and click on the corresponding result.
- Choose Backup Type: In the Backup settings window, select “Create a system image” from the available options.
- Select Backup Destination: You’ll be prompted to choose where to store the backup (external hard drive, network location, or DVDs). Choose your preferred destination.
- Start the Backup: After selecting the backup location, click Start backup. Windows will now create a full backup of your disk, including the OS and all data.
- Restore and Migrate: Once the backup is complete, you can restore it to your new disk if you decide to replace your current one.
While this method works for creating a backup, it doesn’t actually clone the disk, so you may still need to reinstall Windows if you change to a new drive.
Conclusion
In summary, knowing how to clone a disk in Windows 11 is an essential skill for anyone looking to upgrade their storage or protect their data. Whether you’re upgrading to an SSD or simply want to back up your system, using the right tools can make the entire process quick and painless. WittyTool DiskClone offers a fast, easy, and reliable solution for users who want a seamless transition to a new disk. With a simple step-by-step guide, you can clone your entire system in just a few clicks.
Alternatively, if you prefer a built-in solution, Windows 11’s Backup and Restore tool can help you back up your system before upgrading, though it doesn’t provide the same disk cloning benefits as third-party software.

